What to Check Before Your Gazebo Delivery Day
Ordering a gazebo kit is an exciting step toward a more usable backyard. The day the truck arrives, though, can feel rushed. Boxes pile up, the driver is in a hurry, and it is easy to sign for something you have not actually inspected. A calm, methodical check before delivery day saves you from discovering missing parts or a wrong roof style when the ground is already dug.
This article walks through the main points to verify while you still have time to correct them. Each item addresses a common point of confusion or regret that shows up after the kit is on site. Work through them at your own pace, and delivery day becomes a straightforward handoff rather than a puzzle.
Confirm Your Site Measurements Are Current
The most common mismatch between a gazebo kit and reality is the footprint. You measured the patio last spring, but since then a new planting bed has crept in, or the shed now sits two feet closer than you remembered. Double-check the length and width of the area where the structure will go. Mark the corners with stakes and run a string line. This gives you a physical outline you can walk around. If the planned gazebo size fits comfortably inside that outline with at least 18 inches of clearance on each side for assembly access and future maintenance, you are in good shape.
Also measure the height of any overhead obstruction. A low-hanging tree branch, a roofline overhang, or a power line can turn a 10-foot-tall gazebo into a constant headache. If the roof style is a high-pitch design, the peak will be taller than the side walls, so account for that extra height. Write down the measurements and compare them to the kit specifications one more time. It is far easier to cancel or swap a kit now than to return a delivered one.
Understand the Foundation Requirements
Most gazebo kits assume a flat, level base. A concrete slab, a paver patio, or a compacted gravel pad each work, but they demand different prep work. Check what the kit manufacturer recommends for your chosen model. Some kits expect a poured concrete slab with embedded anchor bolts. Others work with a wooden deck or a floating paver base. If the manual says "concrete slab only" and your site has a gravel bed, you need to adjust before the kit arrives.

Foundation depth also matters in cold climates. Frost heave can shift a shallow base and twist the frame over one winter. If you live where the ground freezes, your foundation should extend below the frost line. That requirement may affect how soon you can pour concrete or how much gravel you need to order. Start this work early because concrete needs several days to cure before you can bolt a structure onto it. A rushed pour often cracks under load.
Check the Roof Style and Its Clearance Needs
Gazebo kits come with various roof styles: flat, pitched, bell-shaped, or domed. Each has a different clearance requirement around the edges. A flat roof may need only a few inches of gutter overhang, while a wide bell roof can extend two feet beyond the frame. That overhang can block a walking path or drip onto a neighbor's side of the fence. Measure the roof dimensions from the product drawings, not just the floor dimensions. Mark those overhang points on your site with stakes so you see exactly where the roof will shed water and snow.
Snow load is another concern. A steep pitched roof sheds snow well, but a flat or low-slope roof may accumulate weight beyond the kit's rating. Check the maximum snow load the kit is certified for and compare it to your local building code. If you are in a heavy-snow region, a roof style with a steeper pitch is usually the safer choice. The delivery day is not the time to discover that your roof collects drifts.
Evaluate Wind Exposure and Anchoring Needs
An open-sided gazebo catches wind like a sail. If your yard sits on a hilltop, faces an open field, or has a wide exposure to prevailing winds, the standard anchoring hardware in the kit may not be enough. Look at the kit's wind rating, usually expressed in miles per hour. Most basic kits are rated for winds up to about 70 mph when properly anchored to a solid foundation. That covers most suburban backyards, but exposed sites may need additional ground anchors or a heavier frame.
For sites with high wind exposure, consider upgrading the anchoring system. Concrete footings with threaded rods, helical ground anchors, or heavy-duty brackets can be sourced separately. The kit supplier often lists compatible anchor options. Verify that your foundation can accept those anchors before delivery. Retrofitting after the frame is assembled is awkward and sometimes impossible without partial disassembly.
Review the Floor System and Its Drainage
Many gazebo kits include a floor deck or expect you to build one. If the kit comes with a floor system, check whether it is a pressure-treated wood frame or a metal substructure. Wood frames need a vapor barrier between them and the ground to prevent rot. Metal frames need rust-resistant coatings, especially if they sit on concrete that wicks moisture. In either case, the floor should sit above the surrounding grade so water runs away from it, not into it.
Drainage is easy to overlook. A gazebo with a solid roof and a solid floor can trap water if the ground slopes toward it. Walk around the site after a heavy rain and see where puddles form. If water pools near where the gazebo will stand, you need to regrade the area or install a French drain before the foundation goes in. A damp floor under a gazebo invites mildew and wood rot, and it makes the space unusable for months.

Ventilation and Airflow
A roof traps heat. Even with open sides, a gazebo can become stuffy on a still summer day. Some kits offer a vented roof cap or optional side panels with mesh windows. If your climate has hot, humid summers, consider whether the roof design allows hot air to escape. A cupola or a ridge vent makes a noticeable difference in comfort. If the kit does not include ventilation features, you may want to add a battery-powered fan or plan for open-weave curtains that let air pass through.
Ventilation also matters for vinyl gazebos. These structures use a heavy-duty vinyl fabric for the roof and sometimes for the side walls. Without airflow, condensation can build up under the vinyl, especially in spring and fall when nights are cool and days are warm. The trapped moisture can lead to mold on the fabric and rust on the frame. Checking the ventilation options before the kit arrives lets you order any additional vents or fans at the same time, saving a second shipping charge.
Building Permits and Local Codes
Many towns require a permit for a structure over a certain size, even if it is not permanently attached. The permit process can take weeks, so start it as soon as you order the kit. Your local building department will want to see the kit specifications, foundation details, and a site plan showing setbacks from property lines. Some jurisdictions also require an engineered wind or snow load calculation. The kit manufacturer usually provides these documents, but you may need to ask for them specifically.
Failing to pull a permit can lead to fines and an order to remove the gazebo. Worse, it can create problems when you sell the house because an unpermitted structure may not be listed in the property records. A quick phone call to the building department clarifies what you need. While you are at it, ask about any homeowners' association rules. Some HOAs restrict gazebo placement, roof color, or materials. It is better to learn those limits before the kit is on your driveway.
Plan the Assembly Logistics
Gazebo kits are heavy. A standard 10-by-12-foot kit can weigh several hundred pounds once all the boxes are stacked. Delivery trucks often drop the pallet at the curb or in the driveway. If your site is in the backyard, you need a clear path to move the material. Measure gates, doorways, and side-yard passages. A 48-inch-wide gate will not pass a 60-inch-long box without tilting it, and tilting heavy boxes on a slope is risky. If the path is tight, you may want to disassemble the largest boxes on the driveway and carry the pieces in smaller loads.
Also decide who will assemble the structure. Some kits are designed for two experienced DIYers over a weekend. Others require four people and a full day. If you plan to hire a contractor, book them early because good handymen are often scheduled weeks ahead. On delivery day, check that all boxes are present and undamaged before the driver leaves. Note any crushed corners or torn straps on the delivery receipt. A damaged box does not always mean damaged contents, but it is worth opening that box immediately to verify.
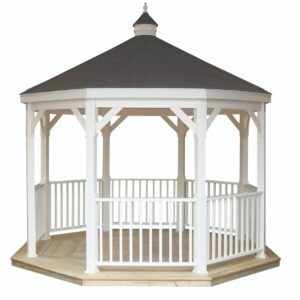
Vinyl gazebos, in particular, benefit from a dry assembly day. Vinyl panels can be tricky to handle in wind, and they need a clean, dry surface for the zippers and snaps to work smoothly. If the forecast calls for rain, postpone the assembly or at least set up a temporary shelter over the work area. Rushing assembly in wet conditions often leads to stretched fabric and misaligned frames.
Finally, confirm that you have all the tools the manual lists. Common items include a socket set, a rubber mallet, a level, a tape measure, and a ladder tall enough to reach the roof peak. Having everything on hand avoids a mid-assembly trip to the hardware store. Delivery day should feel like the start of a project, not a scramble to fix oversights.
A little preparation before the truck arrives turns a potentially stressful delivery into a smooth process. Check your measurements, confirm the foundation, review the roof style and anchoring needs, and handle permits early. Your future self, standing under a completed gazebo on a summer afternoon, will thank you.